
When you tackle a Hydraulic Ball Valve Handle Replacement, you might think any handle will do. That is not true. You need to check the valve model, stem shape, mounting hole, and handle length. Pay attention to the stop plate, locking features, and how much space you have to work with. Always depressurize and isolate the system first. If you skip these steps, you could face leaks or safety problems. Take your time and work methodically for a safe and smooth replacement.
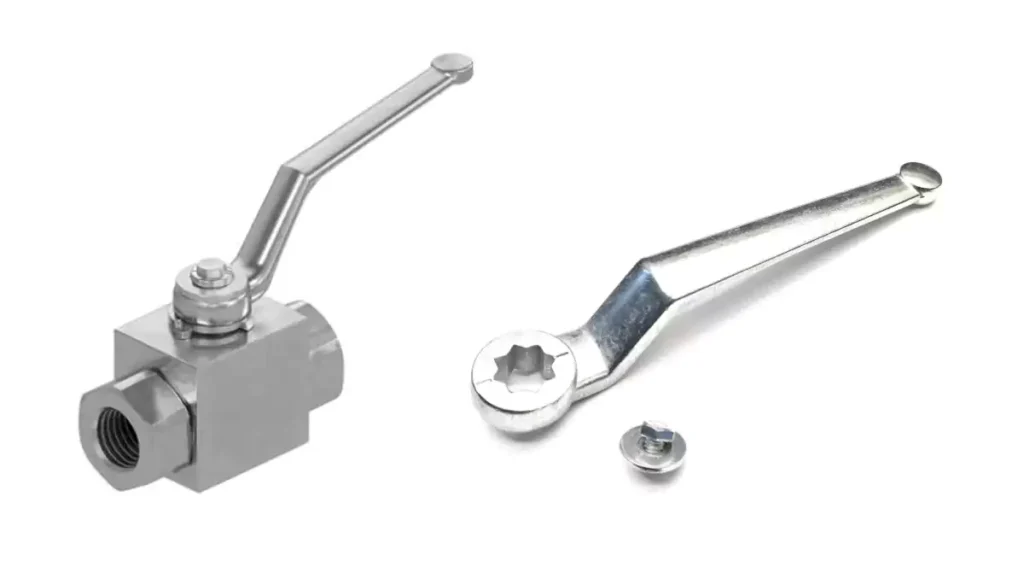
Key Takeaways
- Always make sure to release pressure and separate the hydraulic system before you start changing the handle. This keeps everyone safe.
- Look at the valve model, stem shape, mounting hole, and handle length. Make sure these match the new handle.
- Check the old handle for damage like rust, leaks, or if it is hard to turn. This helps you know if you need a new one.
- Use the right tools like a wrench and wear safety gear. Follow each step carefully when you take off and put on the handle.
- After you put on the new handle, test it. Make sure it moves easily, lines up right, and does not leak.
- Think about using lockable handles for extra safety. This is important in busy or dangerous places so no one turns the valve by mistake.
- Pick a handle material and finish that fits where you will use it. This stops rust and makes the handle last longer.
- Measure and take pictures of the valve and handle before you buy a new one. This helps you get the right part.
When to Replace a Hydraulic Ball Valve Handle
Signs of Handle Wear or Damage
Sometimes, your hydraulic ball valve handle feels odd. It might be hard to move or feel rough. You may see small leaks or rust near the threads. The handle could look crooked. If you see rust or leaks at the stem, the handle needs help. Watch for these things:
- Sticky handle
- Small leaks
- Rust around threads
- Rough feeling when turning
- Crooked handle
- Rust you can see
- Leaks at the stem
If you notice any of these, think about replacing the handle. Don’t ignore these signs. They can cause bigger trouble.
Operational Issues from Handle Failure
A broken handle makes work harder. You might have trouble turning the valve. This can happen if dirt or rust builds up inside. Sometimes, the stem packing is too tight. That puts too much pressure on the stem. If you don’t use the valve much, it can get stuck.
Here are some problems you might see:
- Handle is hard to turn
- More rubbing between parts
- Handle feels stuck or won’t move well
Try loosening the packing nut a little. Open and close the valve a few times to help clean it. If that does not help, you may need to take the valve apart and clean it. Use a silicone-based lubricant when you put it back together. This can help the handle move better.
Tip: If the handle is still hard to turn after cleaning and oiling, replace it. This keeps your system safe and easy to use.
Handle Replacement vs. Full Valve Replacement
You might wonder if you should change just the handle or the whole valve. If the valve body and inside parts are fine, you can just change the handle. This saves time and money. If you see big leaks, lots of rust, or damage inside, you should change the whole valve.
Think about these things:
- Changing the handle is fast and saves money if only the handle is bad.
- Change the whole valve if there is big damage inside or leaks that won’t stop.
Picking the right choice keeps your hydraulic system working well. Always check both the handle and the valve before you decide.
Hydraulic Ball Valve Handle Replacement Compatibility
Valve Model and Size Matching
You want your new handle to fit well. First, check the valve model and size. Every hydraulic ball valve is made a little different. Handles do not always fit every valve. Find the model number on the valve body. If you cannot find it, measure the valve size. If the handle is too big or small, it will not work right. You might have trouble turning the valve. You could even break the stem. Always match the handle to the valve model and size. This helps your Hydraulic Ball Valve Handle Replacement go smoothly.
Here is a simple table to help you remember what to check:
| Compatibility Factor | Description |
|---|---|
| Space constraints around the valve | The space you have changes which handle you need. Small handles are best for tight spots. |
| Safety locking requirements | Lockable handles stop people from using the valve when they should not. This is important for safety. |
| Environment and corrosion exposure | Handles that do not rust last longer in wet or harsh places. |
| Operating frequency and required torque | Simple lever handles are good if you use the valve a lot. Big valves need gear handles. |
Tip: Take a picture of your valve and handle before you start. This helps you see if the new parts look the same.
Handle Mounting and Stem Fit
Now, check how the handle connects to the valve. Handles attach to the valve stem in different ways. Some have a square hole. Others have a round or D-shaped hole. The mounting hole must be the same shape and size as the stem. If it does not fit, the handle will slip or not turn the valve.
You also need to check the fastener. Some handles use a bolt or screw to stay in place. Make sure you have the right bolt or screw. If you use the wrong one, the handle could come loose. That can be dangerous.
- Check the stem shape (square, round, D-shape)
- Measure the stem size
- Match the mounting hole to the stem
- Use the right fastener
Material and Surface Finish
The handle’s material and finish are important. You want a handle that does not rust and lasts a long time. Most handles are made from coated steel or aluminum. These materials make the handle strong and easy to use. Some handles have special coatings like chrome or nickel plating. These coatings stop rust and damage. They are good for tough places like factories or outside.
- Coated steel and aluminum handles last longer
- Chrome or nickel plating stops rust
- Special finishes help in hot or chemical areas
If you work where there is a lot of water or chemicals, pick a handle with a strong finish. This keeps your Hydraulic Ball Valve Handle Replacement working well for a long time.
Safety Checks Before Replacement
Before you start any Hydraulic Ball Valve Handle Replacement, you need to make sure everything is safe. You can’t just grab a wrench and jump in. Hydraulic systems hold a lot of pressure. If you skip safety steps, you could get hurt or damage the equipment. Let’s walk through what you need to check.
Depressurizing the System
Hydraulic pressure can surprise you. If you don’t release it, the handle might fly off or oil could spray everywhere. You need to follow a few steps to make sure the system is safe:
- Preparation & Initial Shutdown: Turn off the power. Put on your gloves and safety glasses. Clear away tools and anything that could get in your way.
- Systematic Release via Controls: Use the control valves to let the pressure out. Move the actuators so they aren’t holding any load. Watch the pressure gauges until they show zero.
- Addressing Residual/Trapped Pressure: Check for spots where pressure might still be hiding. Loosen fittings slowly. If you hear a hiss, stop and wait for it to finish.
- Handling Special Components: If your system has accumulators, follow the instructions from the manufacturer to release their pressure.
Tip: Never rush this step. Take your time and double-check every gauge. If you’re not sure, ask someone with experience.
Isolating the Valve
You don’t want fluid moving through the valve while you work. Isolate the valve so nothing can flow. Close the upstream and downstream valves. Lock them if you can. Tag the system so others know you’re working on it. This keeps you safe and stops accidents.
- Close all nearby valves.
- Lock or tag the controls.
- Make sure no one else can turn the system back on.
Note: Isolation protects you and your coworkers. It also keeps the system clean and prevents leaks.
PPE and Site Safety
Personal protective equipment (PPE) is your shield. Always wear gloves, safety glasses, and sturdy shoes. If you work in a noisy area, use ear protection. Check your work area for slippery spots or sharp objects. Keep your tools organized. Follow your site’s safety rules.
- Gloves protect your hands from sharp edges.
- Safety glasses keep oil and debris out of your eyes.
- Ear protection helps in loud environments.
- Steel-toed boots protect your feet.
Callout: Safety is not just about rules. It’s about making sure you go home in one piece every day.
If you follow these safety checks, you’ll make your Hydraulic Ball Valve Handle Replacement much safer and easier. You’ll protect yourself and your equipment.
Key Dimensions and Fit
Getting the right fit for your hydraulic ball valve handle matters. If you skip measuring key dimensions, you might end up with a handle that wobbles, sticks, or just won’t work. Let’s break down what you need to check.
Stem Shape and Mounting Hole
You need to look at the stem first. The stem is the part sticking out of the valve where the handle attaches. Stems come in different shapes—square, round, or D-shaped. If you pick a handle with the wrong mounting hole, it won’t grip the stem. You might see the handle slip or spin without moving the valve.
- Check the stem shape: Is it square, round, or D-shaped?
- Measure the stem size: Use a caliper or ruler.
- Match the mounting hole: The hole in the handle must fit the stem exactly.
Tip: Take a photo of the stem before you order a new handle. This helps you compare shapes and sizes.
Handle Length and Clearance
Handle length affects how much force you need to turn the valve. A longer handle gives you more leverage, but it needs more space. If your valve sits close to a wall or another pipe, a long handle might hit something. You want a handle that fits your space and lets you turn the valve easily.
Ask yourself:
- How much room do you have around the valve?
- Will a longer handle hit anything nearby?
- Do you need extra leverage for tough valves?
Here’s a quick checklist:
- Measure the space around the valve.
- Pick a handle length that fits your hand and your workspace.
- Make sure the handle won’t bump into pipes, walls, or equipment.
Callout: If you work in a tight spot, choose a shorter handle. It keeps things safe and easy.
Fastener and Screw Position
Handles stay in place with screws or bolts. If the fastener doesn’t line up with the stem, the handle can loosen or fall off. You need to check where the screw hole sits on the handle and the stem. Some handles use a set screw on the side. Others use a bolt from the top.
- Look at the fastener type: Is it a screw, bolt, or pin?
- Check the position: Does the hole line up with the stem?
- Make sure you have the right size fastener.
Note: Always use the correct fastener. If you use the wrong one, the handle might slip or break.
Table: Key Dimensions to Measure
You want to make sure your replacement handle fits perfectly. Here’s a table to help you remember what to measure:
| Dimension | Description |
|---|---|
| Valve Bore Size | The internal opening for fluid flow. It affects how much fluid moves through the valve. |
| Nominal Pipe Size (NPS) | The pipe size the valve connects to. This keeps everything lined up in your system. |
| Valve Body Size | The overall size and shape of the valve. It affects how the handle fits and moves. |
| Flow Coefficient (Cv) | Shows how much flow the valve can handle. Make sure your handle can operate the valve smoothly. |
| Pressure Rating | The pressure the valve can handle. You want a handle that works safely at this pressure. |
| Valve Seat and Stem Dimensions | The size and shape of the seat and stem. This affects sealing and performance. |
Tip: Write down these measurements before you order a new handle. You’ll save time and avoid mistakes.
If you check these dimensions and fit, you’ll get a handle that works smoothly and keeps your hydraulic system safe.
Stop Plate and Locking Features
Stop Plate Alignment
You might notice a small metal piece under your valve handle. That’s the stop plate. It keeps the handle from turning too far. If the stop plate sits in the wrong spot, you can’t open or close the valve all the way. Sometimes, the handle will hit the stop plate before the valve is fully open or shut. This can cause leaks or make the valve hard to use.
Check the stop plate before you put on a new handle. Make sure it lines up with the open and closed positions. If you see any damage or if the plate looks bent, replace it. A good stop plate helps you control the valve and keeps your system safe.
Tip: Take a quick photo of the stop plate and handle before you remove them. This helps you remember how everything should line up.
Lockable Handle Options
Lockable handles give you extra safety. You can lock the valve in the open or closed position. This stops anyone from turning the valve by mistake. In busy places or around heavy equipment, this feature matters a lot.
Advanced locking systems, like the Bear-Loc, make things even safer. These systems lock the handle instantly when hydraulic pressure drops. They stop the valve from moving if something goes wrong. You don’t have to worry about leaks or sudden movement. The lock holds the valve steady, even if the system loses power or pressure.
Here’s what lockable handles can do for you:
- Prevent anyone from using the valve at the wrong time.
- Keep the valve in place during repairs or cleaning.
- Stop the valve from moving if the system fails.
- Hold heavy loads steady, even if something shakes or bumps the system.
Lockable handles also protect your equipment. They keep the valve from drifting or wearing out too soon. You get more control and peace of mind.
Open/Close Position Indicators
It’s easy to forget if a valve is open or closed, especially when you have many valves in one spot. That’s where position indicators help. These are marks or arrows on the handle or stop plate. They show you if the valve is open or shut at a glance.
Some handles have color-coded tips—red for closed, green for open. Others use arrows or labels. You don’t have to guess or check the flow. Just look at the indicator.
| Indicator Type | How It Helps You |
|---|---|
| Color-coded handle | Quick visual check |
| Arrow or label | Shows exact position |
| Raised stop plate | Stops handle at open/closed spot |
Note: Always check the indicator after you install a new handle. Make sure it matches the valve’s real position. This keeps your system safe and easy to use.
Standard, Lockable, and Custom Handles
Standard Handle Uses
Most hydraulic ball valves use standard handles. You turn these handles by hand to open or close the valve. They are good for simple jobs. You do not get extra safety features with them. You can see if the valve is open or closed just by looking. Standard handles are cheap and easy to swap out.
Here are reasons to pick a standard handle:
- You want an easy way to turn the valve.
- You do not need to lock the valve for safety.
- You want a handle that fits most valves.
- You need a fast and simple replacement.
Standard handles do not have locks or special shapes. They just work for basic jobs. If your area is safe and only a few people use the valve, a standard handle is fine.
Tip: Standard handles are best for small machines, test benches, or places where you can always see the valve.
Lockable Handle Benefits
Lockable handles give you more safety and control. You can put a padlock on the handle. This stops people from turning the valve by mistake. Lockable handles are good in busy places or where safety rules are strict. They help you follow lockout/tagout (LOTO) rules. These rules keep workers safe during repairs or cleaning.
Here is a table that shows why lockable handles are helpful:
| Benefit Type | Description |
|---|---|
| Safety Features | Locking ball valves stop people from using the valve when they should not. |
| Tamper-proof Security | Strong locks keep people from messing with the valve. |
| Human Error Reduction | Locking the valve stops mistakes and keeps people safe. |
| Compliance with LOTO | Makes it easy to follow LOTO rules and protect workers. |
| Leak Prevention | Locking the valve helps stop leaks of fluid or gas. |
| System Integrity | Keeps the system safe and stops changes that should not happen. |
| Cost Reduction | Fewer leaks and mistakes mean less time and money spent on repairs. |
| Enhanced Control | You can see and feel if the valve is locked or open. |
You see lockable handles in factories, chemical plants, and other places where safety is important. You can lock the valve open or closed. This helps stop accidents and keeps everyone safe.
Callout: If your job has strong safety rules, always use a lockable handle.
Custom Handle Solutions
Sometimes, you need a special handle. Maybe your valve is in a tight spot. Maybe you want a longer handle for more power. Custom handles can fix these problems. You can get handles with different shapes, sizes, or coatings. Some custom handles are bright colors or have special grips. Others fit special valve stems or work in tough places.
You might need a custom handle if:
- The standard handle does not fit your valve.
- You need a handle with a special length or bend.
- You work with chemicals, heat, or cold.
- You want a handle that matches your company’s safety colors.
Custom handles help you get the right fit. They make your work easier and safer. If you cannot find the right handle, ask a supplier about custom handles.
Note: Take pictures and measure your valve before you order a custom handle. This helps you get the right one.
Hydraulic Ball Valve Handle Replacement Checklist
Changing a hydraulic ball valve handle might look simple, but you need to follow the right steps. This checklist will help you remove the old handle, install the new one, and check your work. Let’s walk through each part together.
Removal Steps
Before you start, make sure the system is safe. You already know to depressurize and isolate the valve. Now, gather your tools and get ready.
What you’ll need:
- Wrench
- Pipe cutter (if you need to remove pipes for access)
- Thread sealant or tape
- Cleaning brush
- Safety gloves
- Safety goggles
Having all your tools ready before you begin makes the job smoother and helps you avoid mistakes.
Step-by-step removal:
- Put on your gloves and safety goggles.
- Double-check that the valve is isolated and the system is depressurized.
- Remove any lock or tag from the handle if you used one.
- Use a wrench to loosen the fastener (screw, bolt, or pin) holding the handle to the stem.
- Gently wiggle and pull the handle off the stem. If it feels stuck, use a cleaning brush to clear away rust or debris.
- Inspect the stem for damage or wear. Clean it with the brush if needed.
- If you see any broken or worn parts, replace them before installing the new handle.
Tip: Take a photo of the old handle and stem before you remove them. This helps you remember how everything fits together.
Installation Steps
Now you’re ready to put on the new handle. Make sure you have the right handle for your valve. Check the stem shape, mounting hole, and handle length.
Here’s what to do:
- Slide the new handle onto the stem. Make sure the mounting hole matches the stem shape.
- Line up the handle with the stop plate or position indicator.
- Insert the correct fastener (screw, bolt, or pin) and tighten it with your wrench. Don’t overtighten—just make it snug.
- If your handle uses a lock, test the locking feature now.
- Apply thread sealant or tape if the fastener needs it.
- Check that the handle moves smoothly from open to closed.
- If you use special fittings, like JIC 37 degree flare fittings, make sure they are tight and secure. Use a flaring tool if needed.
Note: Always use fittings and fasteners with the right pressure rating for your system.
Post-Installation Inspection
You finished the installation, but your job isn’t done yet. You need to check your work to make sure everything is safe and works well.
Follow this inspection checklist:
- Double-check valve alignment: Make sure the handle lines up with the open and closed positions. The handle should be perpendicular to the flow when closed and in line when open.
- Tighten connections and test for leaks: Use your wrench to check all connections. Slowly turn the system back on and watch for leaks.
- Operate the valve: Open and close the valve several times. The handle should move smoothly without sticking or grinding.
- Final inspection: Look at the valve and handle. Make sure everything is tight and secure. Watch for leaks while the system runs.
- Pressure test: Gradually add pressure and check for leaks. Listen for any hissing sounds.
- Check flow integrity: Open the valve and make sure fluid flows easily. Close it and check that the flow stops completely.
- Confirm indicator functionality: If your handle has a position indicator, make sure it matches the valve’s real position.
- Document your results: Write down what you checked and any changes you made. This helps you or your team in the future.
Callout: Never skip the final inspection. A quick check now can save you from big problems later.
If you follow this checklist, your Hydraulic Ball Valve Handle Replacement will go smoothly. You’ll keep your system safe and working well.
Testing Valve Operation
After you finish replacing the handle, you need to test the valve. This step helps you catch problems before they turn into big issues. You want to make sure the valve works smoothly and does not leak. Let’s walk through what you should check.
Leak Checks
Leaks can cause trouble in your hydraulic system. You need to test for leaks right after you install the new handle. Here’s a simple way to do it:
- Body Pressure Test
Seal both ends of the valve. Pressurize the valve to 1.5 times its rated pressure. Use water or soapy water around the valve body. Watch for bubbles. Bubbles mean you have a leak. - Seat Seal Test
Open the valve. Pressurize one end. Check the other end for seepage. Close the valve and test both ends one at a time. If you see fluid coming out, the seat seal is not tight. - Stem Seal Inspection
Wrap test paper around the joint where the stem meets the valve body. If the paper gets wet, you have a leak at the stem.
Tip: Always use soapy water for bubble checks. It makes leaks easy to spot.
If you find leaks, tighten the connections. If leaks continue, you may need to replace seals or check for damage.
Handle Movement and Security
You want the handle to move easily. It should not stick or feel loose. Test the handle by turning it from open to closed several times. Watch for smooth movement. The handle should stop at the right spot. If it feels rough or wobbles, check the mounting hole and fastener.
Here’s a quick checklist:
- Turn the handle fully open and fully closed.
- Feel for smooth movement. No grinding or sticking.
- Check if the handle stops at the correct position.
- Make sure the handle does not wobble or slip.
- Test the locking feature if your handle has one.
Callout: If the handle feels loose, tighten the fastener. If it still wobbles, check the stem for wear.
You can use a table to track your results:
| Test Item | Pass/Fail | Notes |
|---|---|---|
| Leak Check | ||
| Handle Movement | ||
| Locking Feature | ||
| Position Indicator |
Testing the valve operation helps you catch problems early. You keep your hydraulic system safe and reliable.
Ordering the Right Replacement Handle
When you need a new hydraulic ball valve handle, you want to get it right the first time. Picking the wrong handle can waste time and money. It can even cause safety problems. Here’s how you can make sure you order the perfect replacement.
Information to Provide
Before you place your order, gather some key details. This helps the supplier match the handle to your valve. You don’t want to guess and hope for the best.
- Valve model number
- Stem shape and size
- Handle length
- Color or finish you want
- Any special locking or safety features
- Application details (where and how you use the valve)
Tip: Take clear photos of your valve and the old handle. If you have a drawing or sample, share that too. This makes it much easier for the supplier to help you.
You can also use designators to pick handle colors. Here’s a quick table to help you:
| Handle Options | Designator |
|---|---|
| Black | Blank |
| Green | -GR |
| Red | -RD |
| Blue | -BL |
| Yellow | -YW |
| Orange | -OG |
| No Handle | -NH |
If you know your valve size, you can use these codes:
| Valve Size | Designator Example |
|---|---|
| 36 | NY-7K-36-(Color) |
| 38 | NY-7K-38-(Color) |
Sizing and Compatibility
You want your new handle to fit just right. Check the stem shape—square, round, or D-shaped. Measure the stem with a ruler or caliper. Write down the handle length you need. If your valve sits in a tight spot, measure the space around it.
- Match the handle’s mounting hole to your stem.
- Make sure the fastener lines up.
- Pick a handle length that fits your workspace.
Callout: If you need a custom or hard-to-find handle, send a photo or drawing to your supplier. This helps them make or find the right part for you.
Application and Environment
Think about where you use your valve. Some places need special handles. For example, if you work in a hot, wet, or chemical area, you need a handle that can handle those conditions. The wrong handle can rust or break too soon.
Here are some things to consider:
- Fluid type
- Temperature range
- Pressure requirements
- Corrosion resistance
- Cost and budget
- Compliance with safety rules
Check this table for more details:
| Environmental Factor | Description |
|---|---|
| Operating Environment | Extreme temperatures, humidity, or chemicals need special materials. |
| Compliance with Standards | Make sure your handle meets API, ANSI, ISO, or ASME standards. |
Note: If you skip these checks, your handle might corrode or fail early. Always match the handle material and design to your work environment.
When you collect the right info and think about your application, you make ordering easy. You get a handle that fits, lasts, and keeps your system safe.
Conclusion
A hydraulic ball valve handle replacement should match the valve correctly from the beginning. Before replacing the handle, always check the valve model, stem size, mounting hole, handle length, locking structure, installation space, and safety requirements. The hydraulic system should also be depressurized and inspected before any maintenance work.
If the handle does not match the valve, it may affect opening and closing, cause unsafe operation, or fail to solve the real problem. If the valve stem, seal, seat, or valve body is already damaged, replacing only the handle may not be enough.
As a hydraulic ball valve manufacturer, Chenyang Hydraulic can provide standard hydraulic ball valves, replacement handle support, lockable handle options, and custom hydraulic ball valve solutions. Send us your valve model, size, pressure rating, drawings, samples, or working conditions, and we can help you choose or manufacture the right solution for your system.
FAQ
How do you know if your hydraulic ball valve handle needs replacing?
You notice rust, leaks, or the handle feels stiff. Sometimes, the handle looks crooked or won’t turn. If you see these signs, it’s time to replace the handle.
Can you use any handle for your hydraulic ball valve?
No, you can’t. You must match the handle to your valve’s model, stem shape, and mounting hole. Using the wrong handle can cause leaks or make the valve hard to use.
What tools do you need for handle replacement?
You need a wrench, safety gloves, and goggles. Sometimes, you use a cleaning brush or thread sealant. Always check your tools before you start.
Do you need to depressurize the system before replacing the handle?
Yes, you must. If you skip this step, you risk injury or damage. Always release pressure and isolate the valve before you begin.
How do you check for leaks after installing a new handle?
You pressurize the valve and use soapy water around the body and stem. If you see bubbles, you have a leak. Tighten connections or replace seals if needed.
Can you order a custom handle for your valve?
Yes, you can. If your valve needs a special handle, send photos or drawings to your supplier. Custom handles help you fit tight spaces or meet safety rules.
What is a lockable handle, and why should you use one?
A lockable handle lets you secure the valve in open or closed positions. You use it to prevent accidents or follow safety rules in busy workplaces.
How long does it take to replace a hydraulic ball valve handle?
Most replacements take less than an hour. If you have the right tools and handle, you finish quickly. Always check for leaks and smooth movement before you finish.