
Before you start to install a hydraulic flow control valve, make sure you are safe. Let out all the pressure in the system. Take off any weight from cylinders or motors. Wear your safety gear. Choosing the right valve is important, especially when learning how to install a hydraulic flow control valve. You should know how your system is set up. This guide gives you easy steps, tips to adjust, and help if things go wrong. Always put safety first.
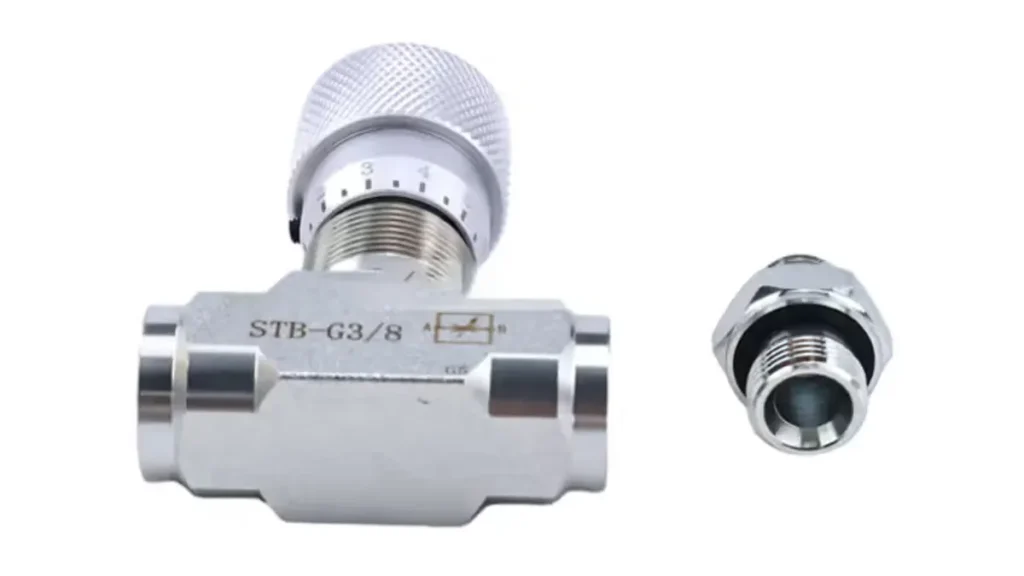
Key Takeaways
- Always stay safe. Release pressure and wear safety gear before you start.
- Pick the right hydraulic flow control valve for your system. This helps your system work its best.
- Clean the hydraulic lines well before you install anything. This stops dirt from hurting your new valve.
- Look for the flow direction arrow on the valve. This helps you avoid mistakes that could break your system.
- Tighten all connections slowly and carefully to stop leaks. Use a torque wrench if you have one for better results.
- Check seals and connections often after you finish installing. This helps you find leaks or damage early.
- Test the actuator movement after you install the valve. This makes sure the valve works right.
- Write down all settings and changes you make during installation. This helps you later with repairs or checks.
Hydraulic Flow Control Valve Basics
What Is a Flow Control Valve
You might wonder what a flow control valve does in your hydraulic setup. This valve lets you control how fast fluid moves through your system. When you adjust it, you change the speed of cylinders or motors. That means you can make a machine arm move slower or faster, just by turning the valve. A hydraulic flow control valve helps you get the right speed and power for each job. It also helps your equipment run smoothly and safely.
Tip: If you want your machine to work at its best, always check that your flow control valve matches your system’s needs.
Types of Hydraulic Flow Control Valves
You will find several types of flow control valves in the field. Each one has a special job. Here are some of the most common types you might see:
- Throttle Valve: You can use this simple valve to restrict flow by hand. It’s budget-friendly, but changes in pressure can affect how well it works.
- Speed Control Valve: People also call this a two-way flow valve. It keeps the flow steady in one direction, even if the load changes.
- Relief Throttle Valve: This valve combines a throttle and a relief valve. It keeps the flow rate steady, no matter how much pressure changes.
- Flow Divider/Combiner Valve: This one splits or combines flow between two actuators. It’s great for making sure two parts move together.
One-Way Valves
A one-way valve, or check valve, lets fluid flow in only one direction. You use it when you want to stop backflow. This keeps your system safe and prevents damage.
Two-Way Valves
A two-way valve controls flow in both directions. You can use it to start or stop flow, or to change the direction of fluid. This type gives you more control over your hydraulic flow control valve setup.
Proportional Flow Divider Valves
This valve splits the flow into two or more paths. You use it when you want two cylinders or motors to move at the same speed. It helps keep your machine parts working together.
Open vs Closed Hydraulic Systems
You need to know if your hydraulic system is open or closed. In an open system, fluid returns to the tank after it does its job. In a closed system, fluid keeps moving in a loop. The type of system you have affects which flow control valve you should pick. Some valves work better in open systems, while others fit closed systems. Always check your system before you choose a valve.
Note: Picking the right valve for your system type helps you avoid problems and keeps your equipment running longer.
A hydraulic flow control valve plays a big part in how your machine works. It controls the speed and power of your actuators. When you pick the right valve and install it the right way, you get better performance and fewer breakdowns.
Why Installation Matters
System Performance Impact
When you install hydraulic control valves the right way, your whole machine works better. You get faster response times and smoother movement. If you want your hydraulic system to run at its best, you need to pay attention to every detail during installation. Here’s what you can expect when you do it right:
- You see improved response times.
- Your machine uses less energy, which saves money.
- You get more accurate control over how things move.
- You spend less on repairs and daily operation.
If you skip steps or rush, you might notice slow movement or jerky actions. Take your time and make sure every valve fits your system.
Safety Risks
Safety should always come first when you work with hydraulic control valves. High pressure can be dangerous if you do not follow the right steps. A valve that faces the wrong way or has a loose connection can cause sudden, uncontrolled motion. This can hurt you or damage your equipment. You also need to keep your system clean. Dirt or debris can block the valve and cause it to fail.
- Always check the orientation of each valve.
- Make sure you tighten every connection.
- Keep your work area clean to avoid contamination.
Remember, a small mistake can lead to big problems. Double-check your work before you start the machine.
Valve Damage Prevention
You can stop most valve problems before they start. Proper installation helps you avoid leaks and keeps your hydraulic control valves working longer. When you line up the connections and tighten them just right, you prevent misalignment and seal damage. Regular checks help you spot worn seals or gaskets before they cause trouble.
- Tighten valves to the right level—never too loose or too tight.
- Inspect seals and gaskets often.
- Make sure every connection lines up straight.
If you follow these steps, your hydraulic control valves will last longer and work better. You will also keep your hydraulic system safe and reliable.
Safety and Preparation
Release Pressure and Remove Weight
Hydraulic systems hold a lot of force. If you skip this step, you risk injury or damage. You need to release all pressure before you start working. Here’s how you can do it:
- Release all pressure from the cylinder or motor.
- Loosen and remove the hydraulic lines from the cylinder.
- Stabilize the cylinder before you remove the pin from the rod end.
- Remove the gland from the cylinder.
- Pull the piston rod out of the cylinder.
- Take the piston off the rod.
- Replace seals and O-rings on the piston and gland if needed.
- Reassemble the piston to the rod.
- Put the gland back into the cylinder.
- Reconnect all hydraulic lines and test for leaks around new seals.
Tip: Always make sure the cylinder or motor is stable before you remove any parts. If you don’t, heavy parts can drop or shift suddenly.
Equipment Shutdown
You must shut down your equipment before you install a hydraulic flow control valve. This step keeps you safe and protects your machine. Follow these steps:
- Stop the pumps to begin the shutdown.
- Close all isolation valves in the system.
- Lock the motor starters for electric motors so nobody can start them by accident. If you can’t lock them, remove the motor fuses.
- Attach your name to locks and removed fuses. Never take off someone else’s lock-out tag.
- If your valve has manual override controls, release any leftover pressure between the valve and actuator. Bleed off pressure in both directions before you close the shut-off valve.
Make sure all signs and notices on the machine are clean and easy to see. This helps everyone know the equipment is safe to work on.
Personal Protection
You need the right gear to stay safe. Hydraulic fluid can spray out fast and hot. Metal parts can pinch or crush fingers. Wear the following:
- Safety glasses or a face shield
- Reinforced gloves
- Steel-toed boots
- Flame-resistant clothing
- Ear protection
Note: Never skip safety gear. Even a small leak can cause big problems. Protect your eyes, hands, and feet every time you work.
You also need to understand the operating instructions for your system. Don’t remove labels or warnings. Use the correct hydraulic oil and keep fluid levels right. Regular inspections help you spot trouble early. If you follow these steps, you’ll keep yourself and your equipment safe.
Flushing Hydraulic Lines
You might think flushing hydraulic lines is just an extra step, but it’s actually one of the most important things you can do before installing a flow control valve. Clean lines help your system run smoother and last longer. If you skip this step, you risk damaging your new valve and other parts of your hydraulic setup.
When you flush the lines, you remove dirt, silt, and tiny bits of metal that build up over time. These contaminants can cause big problems. Here’s what happens if you don’t flush:
- Over 75% of hydraulic failures come from dirty fluid.
- Contaminants can scratch and score pumps and valves.
- Silt can make servo controls stick, which messes up movement.
- Debris speeds up wear in every part of your hydraulic system.
You don’t want to deal with breakdowns or expensive repairs. Flushing keeps your equipment safe and helps you avoid trouble.
Let’s walk through how you can flush your hydraulic lines:
- Start by shutting down the system and making sure all pressure is released.
- Disconnect the lines where you plan to install the valve.
- Use a clean container to catch any old fluid that drains out.
- Run a flushing fluid or clean hydraulic oil through the lines. You can use a hand pump or a flushing rig for this job.
- Keep flushing until the fluid comes out clear and free of particles.
- Check the inside of the lines for any leftover debris. If you see anything, flush again.
- Dry the lines with lint-free cloths or compressed air if your system allows it.
- Reconnect the lines and get ready for valve installation.
Tip: Always use the right flushing fluid for your system. Some fluids can react with seals or gaskets, so check your manual first.
You should also clean the area around the lines. Wipe down fittings and ports. Make sure nothing falls into the open lines while you work. Even a tiny bit of dirt can cause trouble later.
If you want your hydraulic flow control valve to work well, flushing is not optional. It’s a must-do step. Clean lines mean fewer leaks, smoother movement, and longer life for your equipment.
Note: Don’t rush this process. Take your time and check your work. Clean lines protect your investment and keep your system running strong.
Tools and Information Needed
Before you start installing a hydraulic flow control valve, you need the right tools and information. If you want your job to go smoothly, you should gather everything first. This saves time and helps you avoid mistakes.
Tools for Installation
You don’t need fancy equipment, but you do need the basics. Here’s what you should grab:
- Wrenches for tightening and loosening fittings
- Fittings that match your valve and hydraulic lines
- Thread sealant to stop leaks
- Mounting brackets or hardware for securing the valve
You might also want a flashlight if you’re working in a dark spot. If you have a torque wrench, you can make sure you don’t over-tighten connections. Keep your tools clean and organized. This makes your work easier and safer.
Tip: Lay out your tools before you start. If you can see everything, you won’t waste time searching for a wrench or bracket.
Valve Specs to Confirm
You need to check a few important details about your valve. If you skip this step, you might install the wrong valve or put it in backwards. Let’s look at what you should confirm:
Pressure Rating
Every hydraulic flow control valve has a pressure rating. This tells you how much force the valve can handle. If you use a valve with a low rating in a high-pressure system, it can fail. Always check the label or manual. Make sure the valve matches your system’s maximum pressure.
Flow Direction Arrow
Most valves have an arrow cast or stamped on the body. This arrow shows you which way the fluid should flow. If you install the valve backwards, your system won’t work right. Look for the arrow before you connect anything.
Thread Type and Size
Hydraulic systems use different thread types and sizes. You need to match the valve threads to your fittings and lines. If you use the wrong size, you’ll get leaks or damage. Check the specs in your manual or on the valve itself.
Note: Double-check these specs. If you get them wrong, you might have to take everything apart and start over.
Cleaning Supplies
Clean parts and lines help your valve last longer. You need to remove dirt, oil, and metal bits before you install anything. Here’s what you should use:
- Safety glasses, chemical-resistant gloves, long-sleeved work clothes, safety shoes
- Wrenches, hose clamp pliers, nylon brushes, compressed air gun
- Cleaning agents like petroleum ether, kerosene, gasoline, or a professional hydraulic oil line cleaning agent
You can use a nylon brush to scrub inside ports. A compressed air gun blows out dust and debris. If you use a cleaning agent, make sure it won’t harm seals or gaskets.
Tip: Clean everything before you start. Even a tiny bit of dirt can cause big problems in a hydraulic system.
If you gather the right tools and check your valve specs, you’ll make your installation easier and safer. Clean lines and ports help your valve work better and last longer. Take your time and get ready before you begin.
How to Install a Hydraulic Flow Control Valve
Identify Valve Type
You need to start by figuring out which valve you have in your hands. Not all valves do the same job. Some control the direction of the oil, some manage the pressure, and others handle the flow. If you want to know how to install a hydraulic flow control valve, you must pick the right one for your system.
Here’s how you can tell the difference:
- Directional control valves decide where the oil goes. They help move cylinders or motors forward and backward.
- Pressure control valves keep the pressure safe and steady. They stop things from getting too high or too low.
- Flow control valves set how fast the oil moves. They let you control the speed of your machine parts.
Look at the markings on the valve body. You might see words like “flow,” “pressure,” or “direction.” Check your system’s manual if you’re not sure. Picking the right valve type is the first step in the installation process. If you get this wrong, your machine might not work the way you want.
Tip: Always match the valve type to the job you need. If you want to slow down a cylinder, you need a flow control valve, not a pressure valve.
Confirm Pressure and Flow Direction
Now, you need to make sure the valve can handle your system’s pressure and that you install it facing the right way. This step is super important in how to install a hydraulic flow control valve. If you skip it, you could have leaks, damage, or even dangerous movement.
Follow these step-by-step installation procedures:
- Look for an arrow on the valve body. This arrow shows you which way the oil should flow.
- Match the arrow with the direction the oil moves in your system.
- Double-check the pressure rating on the valve. Make sure it’s the same or higher than your system’s pressure.
If you put a flow control valve in backwards, it won’t work right. For example, a one-way throttle can cause uncontrolled movement if you install it the wrong way. Always check the arrow before you tighten anything.
Note: Never guess the flow direction. The arrow is there to help you. If you can’t find it, check the manual or ask your supplier.
Check Thread and Connection
Before you screw anything together, you need to check the threads and connections. This step helps you avoid leaks and makes sure your flow control valve fits your hydraulic lines.
Here’s what you should do:
- Look at the threads on the valve and your fittings. Are they the same size and type? Common types include NPT, BSP, or metric.
- Make sure the connections are clean and free of dirt or metal shavings.
- Test-fit the valve to the line before you add any sealant. It should screw in smoothly without forcing it.
If you use the wrong thread, you might strip the fitting or cause a leak. That’s why checking threads is a key part of how to install a hydraulic flow control valve. Take your time and make sure everything lines up.
Tip: If you’re not sure about the thread type, use a thread gauge or ask a professional. It’s better to check now than fix a leak later.
You’re now ready to move on to cleaning and installing your valve. Each step builds on the last, so don’t rush. Careful work now means fewer problems later.
Clean Ports and Lines
You want your hydraulic system to run smoothly. Cleaning ports and lines before installing your valve is a must. Dirt and debris can cause leaks, blockages, or even damage your new valve. Here’s how you can clean everything the right way:
- Disconnect the hydraulic hose from both ends. Cap the open ports so nothing gets inside.
- Gather your flushing equipment and pick a fluid that matches your system. Make sure it won’t harm seals or gaskets.
- Start the flushing pump. Let the fluid flow through the hose. Begin slow, then increase the flow rate to push out dirt.
- If the hose is really dirty, flush in reverse. This helps knock loose stubborn debris.
- Use compressed air to blow out any leftover fluid. Let the hose air dry completely.
- Reconnect the hose. Fill your system with clean hydraulic fluid. Check for leaks before moving on.
Tip: Always use lint-free cloths and the right cleaning fluid. Even a tiny bit of dirt can cause trouble later.
Install Valve in Correct Direction
You need to install your hydraulic flow control valve facing the right way. If you put it in backwards, your machine might move in ways you don’t expect. Here’s how you can make sure you get it right:
- Look for the cast arrow on the valve body. This arrow shows you which way the fluid should flow. Match it to your system’s flow direction.
- Check the fitting sequence. If you have an SAE ORB fitting, lubricate the O-rings and tighten them to 25–35 Nm for a size -8. For JIC fittings, line everything up perfectly before you tighten.
- Add mechanical support. Install brackets within 150 mm of the valve body. This keeps the valve steady and stops vibration.
Note: Never guess the direction. The arrow is your guide. If you can’t find it, check your manual or ask your supplier.
Tighten Connections
You want your valve to stay leak-free and secure. Tightening connections the right way is key. If you go too loose, you get leaks. If you go too tight, you can damage threads or crush seals. Use a torque wrench if you have one. Here’s a quick guide:
| Dash Size | Tube O.D. | Torque Range (ft-lbs) |
|---|---|---|
| -4 | 1/4″ | 10–11 |
| -6 | 3/8″ | 17–19 |
| -8 | 1/2″ | 34–38 |
| -10 | 5/8″ | 50–56 |
| -12 | 3/4″ | 70–78 |
Tip: If you don’t have a torque wrench, tighten until snug, then give a small extra turn. Don’t force it. If you see leaks, stop and check your work.
You’re almost ready to test your system. Careful cleaning, correct direction, and proper tightening help your valve last longer and work better.
Check Seals
You want your hydraulic system to stay leak-free. Checking the seals is a big part of that. If you skip this step, you might see oil leaks or even damage your new valve. Here’s a simple way to check your seals and make sure everything is tight:
- Look at all the seals and O-rings on your valve and fittings. Make sure they are not cracked or worn out.
- Inspect the cylinder rods for scratches or dents. Damaged rods can ruin seals fast.
- Check the hydraulic lines for any signs of leaks or wet spots.
- Sample the hydraulic fluid. If you see dirt or metal bits, you might need to change the filters or clean the system.
- Replace any seals or O-rings that look old or damaged.
- Make sure all hoses, pipes, and fitting connections are tight and lined up straight.
- Check the fluid level in your reservoir. Low fluid can mean you have a leak somewhere.
- Listen for strange pump noises. Odd sounds can mean air is getting in through a bad seal.
- Inspect the inside of the reservoir for sludge or debris.
- Look at breather caps and filters. Clean or replace them if they are dirty.
Tip: If you find a problem with a seal, fix it before you move on. A small leak now can turn into a big mess later.
Start System Slowly
Now you’re ready to bring your hydraulic system back to life. Don’t rush this part. Starting the system slowly helps you catch leaks or problems before they get worse. Here’s what you should do:
- Turn on the pump at the lowest speed setting. If your system has a soft-start feature, use it.
- Watch the valve and all connections closely. Look for drips, bubbles, or anything that seems off.
- Let the system run for a few minutes. This gives the oil time to move through the new valve and fill any air pockets.
- If you see a leak, shut down the system right away. Tighten the connection or replace the seal, then try again.
- Once you’re sure there are no leaks, slowly increase the speed or pressure to normal levels.
Note: Never stand right over a fitting or valve when you first start the system. High-pressure oil can spray out fast and cause injury.
Test Actuator Movement
After you install your valve and check for leaks, you need to test how your actuator moves. This step shows you if your valve is working right and if your system is safe. Here are some ways you can test actuator movement:
| Testing Method | What to Look For |
|---|---|
| Stroke length | The actuator should move all the way out and back in. It should stop where you expect, both directions. |
| Velocity | Watch how fast the actuator moves. Try it with and without a load. Make sure it moves at the right speed. |
| Frequency or step response | Change the control quickly and see how the actuator reacts. It should respond smoothly, not jerk or lag. |
| Solenoid drop-out and pull-in | If your valve uses a solenoid, check that it switches on and off at the right current. |
| Hysteresis | Move the actuator back and forth. It should follow your commands without sticking or drifting. |
| Proof pressure | Run the system at full pressure. Make sure nothing leaks or bursts. |
| Relief valve operation | Check that the relief valve opens if the pressure gets too high. This keeps your system safe. |
Tip: If the actuator moves too slow, too fast, or not at all, double-check your valve settings and look for leaks. Testing now saves you trouble later.
Monitor for Leaks
You’ve got your valve installed and your system running. Now it’s time to check for leaks. This step keeps your equipment safe and helps you avoid messy surprises later. Leaks can start small and grow fast, so you want to catch them early.
Start by looking closely at every connection, fitting, and seal. Use a flashlight to spot any shiny spots or wet areas. Sometimes, leaks hide in places you can’t see right away. Don’t just rely on your eyes—try these smart ways to find leaks:
- Soap Solution Test: Mix a little soap with water and brush it onto the fittings and joints. If you see bubbles, you’ve found a leak. This trick works great for small leaks you might miss.
- Acoustic Emission Testing: Use special sensors to listen for the sound of escaping fluid. This method works even when your shop is noisy.
- Temperature Monitoring: Feel around the valve and lines. Leaks often cause cool or warm spots because fluid escapes and changes the temperature.
- Remote Monitoring Systems: Some systems use sensors to watch fluid levels and send alerts if something changes. These tools help you spot leaks before they become a big problem.
Tip: Don’t just check once. Make leak checks part of your regular routine. Leaks can show up days or weeks after you finish the job.
You can also set up a plan to keep leaks under control:
- Set a preventive maintenance schedule. Check your system often and look for early signs of trouble.
- Train everyone who works on your system. Show them how to spot leaks and use detection tools.
- Keep a log of every inspection. Write down what you find and when you fix things. This helps you spot patterns and keeps your system in top shape.
Leaks waste oil, make a mess, and can even hurt your equipment. Stay alert and act fast if you see anything unusual.
Record Settings
You’ve finished your installation and checked for leaks. Now, you need to record your valve settings. This step helps you keep your system running smoothly and makes future maintenance easier.
Here’s what you should do:
- Write down all the settings you adjusted during installation. This includes flow rates, pressure settings, and any special notes about the valve position.
- Mark the exact position of the valve. You can use a marker or a tag so you know where everything started.
- Tighten any locknuts or set screws to keep your settings in place. This stops things from shifting over time.
- Store your notes in a safe place. Keep them with your maintenance records or in a digital log.
Note: Good records save you time and trouble later. If you ever need to adjust or replace the valve, you’ll know exactly how it was set up.
Taking a few minutes to document your work now can save hours of guesswork down the road. Your future self will thank you!
Hook Up Flow Control Valve
When you start adding flow control valve to your hydraulic system, you want to make sure every connection is solid. You need to hook up the valve to the hydraulic line the right way. If you miss a step, you might see leaks or trouble with your machine.
Connecting to Hydraulic Line
You have a few choices for connecting your flow control valve. You can use hoses, pipes, adapters, or a manifold. Each option works for different setups. If you use hoses, make sure they are strong and rated for your system. Pipes give you a sturdy connection. Adapters help you fit different thread types. A manifold lets you mount several valves together.
When adding flow control valve, you need to connect the right ports. The inlet port takes oil from the pump. The outlet port sends oil back to the tank. Sometimes, you see a pump port marked with a “P.” Always check the markings before you start.
Here’s a simple table to help you remember the steps:
| Step | Action |
|---|---|
| Connect pump line | Attach to inlet port |
| Connect tank line | Attach to outlet port |
| Tighten fittings | Use wrench, avoid overtightening |
You should check seals and gaskets for damage before adding flow control valve. Tighten the valve and fittings to stop leaks. If you see a leak, fix or change the hydraulic lines. Secure hoses and fittings so they stay safe during use.
Tip: If you want your system to last, always double-check every connection after adding flow control valve.
Placement Near Component
You want to place your flow control valve close to the component you want to control. If you are adding flow control valve to a cylinder or motor, keep the valve nearby. This helps you get the best response and makes adjustments easier. When you put the valve too far away, you might see slow movement or less control.
Try adding flow control valve right next to the actuator. If you use a manifold, mount the valve in a spot that is easy to reach. You can use brackets or clamps to hold the valve steady. Make sure nothing blocks the valve or makes it hard to adjust.
Note: Good placement makes adding flow control valve simple and keeps your system running smooth.
Integrating with Actuator, Cylinder, Motor
When you finish adding flow control valve, you need to connect it to the actuator, cylinder, or motor. You want the oil to flow through the valve before it reaches the moving part. This lets you control speed and movement.
If you are adding flow control valve to a cylinder, connect the valve between the pump and the cylinder port. For a motor, hook up the valve between the pump and the motor inlet. Always follow the flow direction arrow on the valve body.
You can use adapters if the threads do not match. Make sure every fitting is tight and lined up straight. After adding flow control valve, test the actuator. Watch for leaks and check that the movement is smooth.
If you see jerky motion or slow response after adding flow control valve, check your connections and valve settings.
Adding flow control valve is a key step in making your hydraulic system work the way you want. You get better control, safer operation, and longer life for your equipment.
Flow Control Valve Adjustment
Proper Adjustment Steps
You want your hydraulic system to work just right. To do that, you need to adjust your flow control valve the correct way. Start with these simple steps:
- Turn off your machine and release all pressure.
- Find the adjustment knob or screw on your flow control valve.
- Turn the knob slowly. Go clockwise to decrease flow. Go counterclockwise to increase flow.
- Make small changes. Check the movement of your cylinder or motor after each turn.
- Lock the setting if your valve has a locknut or set screw.
Tip: Always read your valve’s manual before you start. Some valves have special instructions.
Testing and Fine-Tuning
After you set your flow control valve, you need to test how your machine moves. Watch the actuator as you run the system. Does it move too fast? Does it move too slow? If you see a problem, stop and adjust the valve again.
Try these steps for fine-tuning:
- Run the actuator through its full range.
- Listen for strange noises. Squeaks or rattles can mean something is wrong.
- Feel the valve and lines. If they get hot, you might have too much flow.
- Use a stopwatch to check speed if you want exact results.
Here’s a quick table to help you remember what to check:
| What to Check | What It Means |
|---|---|
| Smooth movement | Good adjustment |
| Jerky movement | Adjust valve, check for air |
| Slow response | Increase flow |
| Overheating | Decrease flow |
If you want the best results, make small changes and test each time. Patience pays off with flow control valve adjustment.
Common Adjustment Mistakes
You can avoid a lot of trouble if you know what mistakes to watch for. Here are some common problems people run into with a flow control valve:
- Turning the knob too fast or too far
- Forgetting to lock the setting
- Ignoring the flow direction arrow
- Skipping the leak check after adjustment
- Using the wrong tool for the knob or screw
Note: If you rush, you might damage the valve or make your system unsafe. Take your time and double-check your work.
When you follow these steps, you get smooth, safe, and reliable control from your flow control valve. Good adjustment means less downtime and better performance for your hydraulic system.
Common Installation Mistakes
Wrong Flow Direction
You might think installing a valve is as simple as screwing it in, but the direction really matters. If you put your hydraulic flow control valve in backwards, your system will not work right. The oil will try to move the wrong way. This can cause jerky movement, slow response, or even damage your equipment.
Most valves have an arrow on the body. This arrow shows you which way the fluid should flow. Always match this arrow with the direction of oil in your system. If you cannot find the arrow, check the manual or ask your supplier.
Tip: Never guess the flow direction. Double-check before you tighten anything. A simple mistake here can lead to hours of troubleshooting later.
Incorrect Thread or Connection
Threads and connections might look similar, but they are not always the same. If you use the wrong thread type or size, you will get leaks. Sometimes, you might even damage the valve or the fitting. Hydraulic systems use different thread types like NPT, BSP, or metric. You need to match the valve threads to your system.
Here is a quick table to help you remember:
| Thread Type | Common Use | What Happens If Wrong? |
|---|---|---|
| NPT | North America | Leaks, stripped threads |
| BSP | Europe, Asia | Poor fit, leaks |
| Metric | Modern equipment | Won’t seal, cross-threading |
Before you install, check the threads on both the valve and the fitting. If you are not sure, use a thread gauge or ask a professional. Never force a connection. If it does not fit easily, it is probably the wrong type.
Note: Mixing up threads is one of the fastest ways to cause a leak. Always check twice!
Over-Tightening
You want your valve to be secure, but tightening too much can cause problems. Over-tightening can crush seals, strip threads, or even crack the valve body. If you use too much force, you might not see a leak right away, but damage can show up later.
Use a torque wrench if you have one. Follow the recommended torque values for your valve size. If you do not have a torque wrench, tighten until snug, then give a small extra turn. Never use a pipe for extra leverage.
- Signs you have over-tightened:
- Crushed or deformed seals
- Threads that look stripped or shiny
- Valve body with small cracks
Alert: If you notice any of these signs, stop and fix the problem before running your system. Over-tightening can lead to sudden leaks or even system failure.
Taking your time with these steps helps you avoid the most common mistakes. You will save yourself a lot of trouble and keep your hydraulic system running smoothly.
Ignoring Pressure Rating
You might think any valve will work in your hydraulic system, but pressure rating matters a lot. If you ignore the pressure rating, you risk big problems. Every hydraulic flow control valve comes with a maximum pressure it can handle. If your system pushes more pressure than the valve can take, you could see leaks, broken seals, or even a burst valve. That’s not just a mess—it’s dangerous.
Here’s what you should always do:
- Check the valve’s pressure rating before you install it. You can find this number on the valve body or in the manual.
- Compare the rating to your system’s maximum pressure. Make sure the valve can handle the highest pressure your pump can create.
- Never guess. If you’re not sure, ask your supplier or check the specs online.
Alert: Using a valve with a lower pressure rating than your system can lead to sudden failure. This can cause injury or damage your equipment.
A quick table can help you remember what to check:
| Valve Pressure Rating | System Pressure | Safe to Use? |
|---|---|---|
| 2500 PSI | 2000 PSI | ✅ Yes |
| 1500 PSI | 2000 PSI | ❌ No |
| 3000 PSI | 2500 PSI | ✅ Yes |
If you want your system to last, always match or exceed the pressure rating. Don’t take shortcuts here.
Mixing Seal Materials
You might not think much about seals, but they play a huge role in keeping your hydraulic system leak-free. Mixing different seal materials can cause trouble. Some seals work with certain fluids, while others break down fast. If you mix rubber with Viton or use the wrong type for your oil, you might see swelling, cracking, or leaks.
Here’s how you can avoid this mistake:
- Check the material of every seal and O-ring. Look for labels or ask your supplier.
- Use the same type of seal throughout your system. This keeps things simple and safe.
- Match the seal material to your hydraulic fluid. Some fluids need special seals.
Tip: If you see a seal that looks swollen or cracked, replace it with the right material. Don’t mix and match just because it fits.
Mixing seal materials can lead to early failure. You might not see a leak right away, but problems will show up over time. Stick with one type and you’ll have fewer headaches.
Wrong Valve Type
Not all flow control valves do the same job. If you pick the wrong type, your system won’t work the way you want. For example, a throttle valve can’t replace a flow divider. A one-way valve won’t control flow in both directions. You need to match the valve type to your system’s needs.
Here’s what you should do:
- Read your system manual. It will tell you which valve type you need.
- Ask questions if you’re not sure. Suppliers and manufacturers can help.
- Look at the markings on the valve. They often show the type and function.
Note: Using the wrong valve type can cause jerky movement, slow response, or even damage your machine. Always double-check before you install.
If you want smooth, safe operation, choose the right valve for the job. It saves time and keeps your equipment running strong.
Not Flushing Lines
You might think skipping the line flushing step saves time. It doesn’t. If you don’t flush your hydraulic lines before installing a flow control valve, you set yourself up for trouble. Dirt, metal shavings, and old oil hide inside those lines. They wait for a chance to mess up your new valve.
When you skip flushing, you let all that junk flow right into your valve. That can block the valve or scratch the inside. You might see jerky movement or hear strange noises. Sometimes, the valve stops working after just a few hours. You don’t want that.
Here’s what can happen if you don’t flush your lines:
- The valve gets stuck or moves slow.
- Seals wear out faster.
- Oil leaks show up around fittings.
- The whole system runs rough or noisy.
- You spend more money on repairs.
Tip: Flushing lines is like brushing your teeth before bed. It keeps everything clean and working longer.
You can flush lines with clean hydraulic oil or a special flushing fluid. Use a hand pump or a flushing rig. Run the fluid through the lines until it comes out clear. If you see dirt or metal bits, keep flushing. Don’t rush this step. Clean lines mean fewer problems later.
Here’s a quick checklist for flushing lines:
- Shut down the system and release all pressure.
- Disconnect the lines where you plan to install the valve.
- Catch old oil in a clean container.
- Run flushing fluid through the lines.
- Check the fluid for dirt or metal.
- Repeat until the fluid looks clean.
- Dry the lines with lint-free cloth or air.
- Reconnect everything and get ready to install the valve.
If you want your hydraulic system to last, never skip flushing. Clean lines protect your investment. You save time, money, and headaches down the road.
Note: Even a tiny bit of dirt can ruin a new valve. Take a few extra minutes to flush, and your system will thank you.
Testing and Troubleshooting
Commissioning and Air Purge
You just finished installing your hydraulic flow control valve. Now, you need to get your system ready for action. This step is called commissioning. You want to make sure everything works before you put your machine back to work.
Start by filling your reservoir with clean hydraulic oil. Check the fluid level. If it looks low, add more oil. Next, turn on the pump at the lowest speed. Watch for leaks around the valve and fittings. If you see oil dripping, stop and tighten the connections.
Air can get trapped inside your hydraulic lines during installation. You need to get this air out. This process is called air purging. If you skip this, your actuator might move in a jerky way or make strange noises.
Here’s how you can purge air from your system:
- Open the bleed screws on your actuator or cylinder.
- Run the pump slowly. Let oil push the air out of the open screws.
- Close the bleed screws when you see a steady stream of oil with no bubbles.
- Cycle the actuator back and forth a few times. This helps push out any leftover air.
- Check the reservoir again. Add oil if needed.
Tip: Never stand right over a bleed screw. Oil can spray out fast and cause injury.
Performance Monitoring
You want your hydraulic system to run smooth and safe. After you finish commissioning, you need to keep an eye on how things work. This is called performance monitoring.
Watch your actuator as it moves. Does it go at the right speed? Does it stop where you want? Listen for odd sounds like squeaks or rattles. Feel the valve and lines. If they get hot, you might have a problem.
You can use a simple checklist to help you monitor performance:
| What to Check | What’s Normal | What’s Not Normal |
|---|---|---|
| Actuator movement | Smooth and steady | Jerky or slow |
| Valve temperature | Warm to the touch | Very hot or cold |
| Noise | Quiet operation | Squeaks, rattles, bangs |
| Oil leaks | Dry connections | Wet spots, drips |
If you spot something strange, stop and check your system. Small problems can turn into big ones if you ignore them.
Diagnosing Issues
Sometimes, things don’t go as planned. If your hydraulic system acts up, you need to figure out what’s wrong. This is called diagnosing issues.
Start with the basics. Check for leaks first. Look at every fitting and seal. If you see oil, tighten the connection or replace the seal.
Next, check the flow direction. Make sure the arrow on your valve matches the oil flow. If the valve is backwards, your actuator might not move right.
If your actuator moves slow or jerky, air might be trapped inside. Try purging the air again. If that doesn’t help, check your valve settings. Maybe you need to adjust the flow.
Here’s a quick list of common problems and what to do:
- Leak at fitting: Tighten or replace seal.
- Jerky movement: Purge air, check for dirt.
- Actuator won’t move: Check flow direction, valve setting.
- Valve gets hot: Reduce flow, check for blockages.
Note: If you can’t fix the problem, ask a professional for help. Don’t run your system if something feels wrong.
Testing and troubleshooting keep your hydraulic system safe and strong. Take your time, check your work, and you’ll avoid most problems.
When to Replace Valve
You might wonder, “How do I know when it’s time to swap out my hydraulic flow control valve?” Good question! Valves don’t last forever. If you catch the signs early, you can avoid bigger problems and keep your system running smooth.
Here are some clear signs your valve needs replacing:
- Frequent Leaks: If you keep finding oil under your machine, even after tightening connections and changing seals, your valve might be worn out.
- Sticky or Jerky Movement: When your actuator moves in a jumpy way or gets stuck, the valve could be clogged or damaged inside.
- Slow Response: If your system feels sluggish, even after you adjust the valve, it might mean the valve can’t control flow like it used to.
- Unusual Noises: Listen for hissing, rattling, or banging near the valve. Strange sounds often mean something’s wrong inside.
- Visible Damage: Cracks, rust, or dents on the valve body are big warning signs. Don’t ignore them.
Tip: If you see metal shavings or dark sludge in your hydraulic fluid, your valve might be breaking down from the inside.
You can use this quick checklist to help decide if it’s time for a new valve:
| Symptom | What It Means | Action Needed |
|---|---|---|
| Oil leaks | Worn seals or body | Replace valve |
| Jerky actuator motion | Internal damage or blockage | Replace or clean |
| Slow operation | Valve wear or clog | Replace valve |
| Noisy operation | Internal failure | Replace valve |
| Cracked housing | Physical damage | Replace valve |
Sometimes, you can fix a valve by cleaning or changing a seal. If problems keep coming back, though, it’s smarter to replace the valve. Old or damaged valves can cause more than just slowdowns—they can lead to safety risks and expensive repairs.
Don’t wait for a total breakdown. If you spot these warning signs, plan for a replacement soon. Keep a spare valve on hand if your machine is critical. That way, you can swap it out fast and get back to work.
Note: Regular checks and quick action help your hydraulic system last longer and work better. Stay alert, and your equipment will thank you!
Choosing the Right Flow Control Valve
Matching Valve to System
You want your hydraulic system to work well, so you need to pick a flow control valve that fits your setup. Start by looking at what your machine does every day. Does it lift heavy loads? Does it move fast or slow? Each job needs a different kind of valve. If you use a valve that does not match your system, you might see jerky movement or slow response.
Think about where you want to control the flow. Some valves work best near the pump. Others do a better job close to the actuator, like a cylinder or motor. You should also check if your system is open or closed. Open systems send oil back to the tank. Closed systems keep oil moving in a loop. The right valve will help your hydraulic system run smoother and last longer.
Tip: Always check your machine’s manual. It often tells you which valve type works best for your setup.
Pressure, Flow, Connection
Now, let’s talk about three things you can’t ignore: pressure, flow, and connection. First, check the pressure rating on the valve. Your valve must handle the highest pressure your hydraulic system can make. If you pick a valve with a low rating, it might break or leak.
Next, look at the flow rate. This tells you how much oil can move through the valve in a set time. If your valve is too small, your machine will move slow. If it’s too big, you might lose control. Match the flow rate to your system’s needs.
Connections matter, too. Valves come with different threads and sizes. You need to match these to your hoses or pipes. If you use the wrong connection, you could get leaks or damage the valve. Always double-check the size and type before you buy.
Here’s a quick table to help you remember:
| What to Check | Why It Matters |
|---|---|
| Pressure Rating | Stops leaks and breaks |
| Flow Rate | Keeps movement smooth |
| Connection | Prevents leaks and damage |
Material and Working Conditions
You want your valve to last a long time. That means you need to think about what it’s made of and where it will work. Some valves use steel, while others use brass or stainless steel. If your hydraulic system works outside or in a wet place, stainless steel might be best. It fights rust and lasts longer.
Temperature matters, too. If your machine gets hot or cold, pick a valve that can handle those changes. Some seals work better with certain oils or fluids. Always check if the valve and seals match your hydraulic fluid.
Note: If you use the wrong material, your valve might wear out fast or even fail. Take a minute to check before you buy.
Choosing the right flow control valve helps your hydraulic system work better, last longer, and stay safe.
Buyer Information Needed
Before you buy a hydraulic flow control valve, you need to gather some key details. If you skip this step, you might end up with the wrong valve for your system. That can lead to leaks, slow movement, or even damage. Let’s make sure you get it right the first time!
Here’s a checklist of what you should know before you talk to a supplier or place an order:
- System Pressure: Write down the maximum pressure your hydraulic system can reach. You can find this in your machine’s manual or on the pump label.
- Flow Rate: Measure or check the flow rate your system needs. This is usually in gallons per minute (GPM) or liters per minute (LPM).
- Fluid Type: Know what kind of hydraulic oil or fluid your system uses. Some valves need special seals for certain fluids.
- Connection Size and Type: Check the thread size and type on your hoses or pipes. Look for markings like NPT, BSP, or metric.
- Valve Function: Decide what you want the valve to do. Do you need to control flow in one direction or both? Do you need a simple throttle or a flow divider?
- Operating Environment: Think about where the valve will work. Will it be outside, in a hot place, or near chemicals? This helps you pick the right material.
- Mounting Style: Some valves bolt onto a manifold. Others fit in-line with hoses. Know which style fits your setup.
- Special Features: Do you need a valve with a lock, a manual override, or a special adjustment knob? Make a note of any extras.
Tip: Take photos of your current setup. Pictures help suppliers understand what you need and spot any special requirements.
You can use a table like this to organize your info:
| Information Needed | Your System Details |
|---|---|
| Max Pressure (PSI) | |
| Flow Rate (GPM/LPM) | |
| Fluid Type | |
| Connection Size/Type | |
| Valve Function | |
| Environment | |
| Mounting Style | |
| Special Features |
When you have all this information ready, you make the buying process much easier. Suppliers can help you faster. You also avoid mistakes that cost time and money.
If you’re not sure about something, ask your machine’s manufacturer or a hydraulic expert. It’s always better to double-check than to guess.
Note: The more details you share, the better your new valve will fit and work in your system.
Now you’re ready to shop with confidence!
Conclusion
You now know how to install a hydraulic flow control valve safely and correctly. Before installation, always confirm the valve type, flow direction, pressure rating, connection size, seal compatibility, and installation position. A correctly installed valve can help control actuator speed, reduce unstable movement, and keep the hydraulic system working smoothly.
Common problems such as wrong flow direction, loose fittings, poor sealing, or contaminated hydraulic lines can affect valve performance. That is why proper installation, careful adjustment, and final testing are important for every hydraulic system.
As a hydraulic valve manufacturer, Chenyang Hydraulic provides hydraulic flow control valves, hydraulic throttle valves, and custom hydraulic valve solutions for industrial applications. If you need a standard valve or a custom design, send us your pressure rating, flow requirement, connection type, drawings, samples, or working conditions. Our team can help you choose or manufacture the right valve for your system.
FAQ
How do I know which way to install the flow control valve?
Look for an arrow on the valve body. This arrow shows the correct flow direction. If you can’t find it, check your manual or ask your supplier. Never guess the direction.
Can I adjust the flow control valve while the system is running?
Yes, you can. Turn the adjustment knob slowly. Watch the actuator as you make changes. Always wear safety gear when making adjustments.
What should I do if my valve leaks after installation?
First, check all fittings and seals. Tighten connections gently. Replace any damaged seals. If the leak continues, you may need a new valve.
How often should I check my flow control valve?
Check your valve during every routine maintenance. Look for leaks, strange noises, or slow movement. Regular checks help you catch problems early.
Can I use any hydraulic oil with my valve?
No, you can’t. Always use the oil type listed in your system manual. The wrong oil can damage seals and reduce valve life.
What tools do I need for installation?
You need wrenches, thread sealant, and cleaning supplies. A torque wrench helps prevent over-tightening. Keep all tools clean and ready before you start.
Why does my actuator move slowly after installing a new valve?
You may have set the flow too low. Try adjusting the valve. Also, check for trapped air or clogged lines. If the problem stays, review your installation steps.