
You want your hydraulic system to work well and last longer. That is why you need to know about hydraulic check valve flow direction. A check valve lets fluid go in only one direction. It stops backflow and keeps your equipment safe. If you put the valve in the wrong way, problems can happen quickly.
If the flow goes the wrong way, backflow can happen. This can hurt your system and cause leaks. Fluids might go where they should not. Also, if the flow is not steady or is too low, the system wastes energy. This makes your costs go up.
When pressure changes in a system that should flow one way, backflow can happen. This can make machines work in ways they are not made for. It can break them and cost a lot to fix.
Always look for the flow direction arrows and follow the maker’s instructions. Take time to do safety steps before you start.
Key Takeaways
- Check valves let fluid move in only one way. This stops backflow and keeps your hydraulic system safe.
- Always find the flow direction arrows on the valve. This helps you install it the right way and prevents expensive errors.
- Pick the right check valve for your system. Poppet valves seal better. Ball valves are easier and work well.
- Before you install, turn off the hydraulic power for safety. Check the valve for dirt or damage.
- Tighten the fittings the right way to stop leaks. First, use your hand. Then use a wrench, but do not make it too tight.
- Check your check valve often for leaks, strange sounds, or slow movement. This helps your system work well.
- Pick the right valve size and material for your system. Match it to the pressure and fluid type for best results.
- If you see problems like cylinder drift or pressure drops, check the valve first. Look at how it is installed and if it is in good shape.
Hydraulic Check Valve Flow Direction Basics
One-Way Operation
When you look at a hydraulic system, you want the fluid to move in just one direction. That is where a check valve comes in. This valve acts like a one-way door for the fluid. It opens when the pressure at the inlet gets high enough. This pressure must be greater than the valve’s cracking pressure. Once that happens, the valve lets the fluid flow through. If the pressure drops or tries to reverse, the valve closes right away. This simple action keeps your system safe and working as it should.
Tip: Always check the hydraulic check valve flow direction before you install the valve. This step helps you avoid mistakes and keeps your system running smoothly.
Preventing Backflow
You do not want fluid moving backward in your system. That can cause damage and even lead to leaks. Preventing backflow is one of the main jobs of a check valve. These valves work automatically. When the fluid tries to move the wrong way, the valve closes. This action protects your pumps, cylinders, and other parts from harm.
Here is a quick look at how different mechanisms help with preventing backflow:
| Mechanism | Description |
|---|---|
| Disc/Flap/Ball | Internal parts that open when pressure is high enough and close to stop backflow. |
| Spring-loaded | Uses a spring to close the valve when flow reverses, set for certain pressure levels. |
- Check valves operate on their own to allow flow in one direction.
- They close to stop reverse flow, which keeps your system safe.
- The spring inside is set to work at certain pressures, so you get reliable operation every time.
Internal Mechanism: Poppet and Ball
Inside a check valve, you will find different designs that help control flow. The two most common are poppet and ball mechanisms. Each type has its own way of sealing and letting fluid pass.
| Mechanism Type | Function | Description |
|---|---|---|
| Ball Check | Prevents reverse flow | Uses a round ball that sits on a seat. It seals well and lets fluid move with little pressure loss. |
| Poppet Check | Controls flow | Has a guided poppet that moves up and down. It seals tightly and works well in high-pressure systems. |
- Poppet check valves give you a tighter, leak-free seal. They work best when you need to make sure no fluid goes backward.
- Ball check valves are common and easy to use. They seal well and do not slow down the flow much.
When you pick a check valve, think about what your system needs. If you want the best seal and high pressure, go with a poppet type. If you want simple and reliable, a ball type might be right for you.
Identifying Flow Direction
When you install a check valve, you want to make sure the fluid moves the right way. If you get the direction wrong, your system might not work at all. Let’s look at how you can spot the correct flow direction before you start.
Valve Markings and Symbols
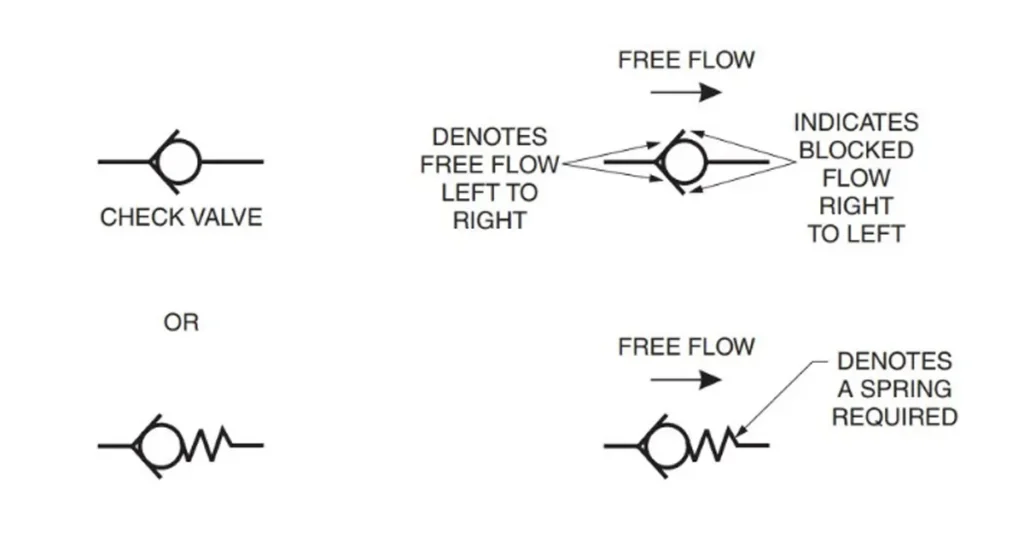
Most hydraulic check valves have clear markings right on the body. These markings help you see which way the fluid should flow. You might notice:
- A flow direction arrow. This arrow shows you the path the fluid should take. The arrow always points from the inlet to the outlet. Never install the valve so the arrow points against the flow.
- A check mechanism icon. Sometimes, you’ll see a small symbol that looks like a ball, spring, or flap. This tells you what kind of internal part is inside the valve.
You might also spot a hydraulic symbol stamped or printed on the valve. This symbol is important. It shows that fluid can pass in one direction but not the other. You’ll see these symbols in places where backflow could cause big problems, like pump lines or chemical pipes.
Tip: Always look for these markings before you install the valve. If you can’t find them, check the box or the paperwork that came with the valve.
Inlet and Outlet Ports
You need to know which side is the inlet and which is the outlet. If you mix them up, the valve won’t work. Here’s how you can tell:
- Find out which way the fluid should move in your system.
- Look for the arrow or symbol on the valve. This will show you the correct direction.
- Check your project legend or diagram. It should tell you which port is the inlet and which is the outlet.
Check valves only let fluid move one way. If you install the valve backwards, you might get backflow or lose pressure. That can make your hydraulic system less efficient.
Manufacturer Drawings
Sometimes, you need more than just a quick look at the valve. Manufacturer drawings can help. These drawings usually show a stamped valve symbol right on the valve body. This symbol is a visual clue. It tells you which way the valve should face and which way it will close. If you’re not sure, always check the manufacturer’s instructions or diagrams. They give you the details you need for a safe and correct installation.
Note: If you ever feel unsure about the hydraulic check valve flow direction, stop and double-check the manufacturer’s drawing. It’s better to take a few extra minutes now than to fix a big problem later.
By using markings, checking the ports, and reviewing the manufacturer’s drawings, you can always get the flow direction right. This step keeps your system safe and running smoothly.
Installation Steps
Safety and Pre-Checks
Before you start installing a check valve, you need to make sure everything is safe. Turn off the hydraulic power. Release any pressure in the system. Wear gloves and safety glasses to protect yourself from oil or sharp edges. Check your tools and parts. Make sure you have the right valve for your system. Look at the valve for any damage or dirt. Clean the ports if you see any debris. Double-check the hydraulic check valve flow direction by looking for arrows or markings on the valve body. This step helps you avoid mistakes later.
Tip: Always read the manufacturer’s instructions before you begin. Each valve might have special steps or warnings.
Position and Orientation
Getting the position and orientation right is key for a smooth installation. You want the valve to work with the flow, not against it. Place the valve so the arrow or symbol matches the flow direction in your system. If you install it backwards, the fluid will not move, or you might get backflow.
Vertical vs. Horizontal
You can install most check valves in either a vertical or horizontal position. Still, you need to think about how gravity and flow will affect the valve. In a vertical setup, the flow should go up through the valve. This helps the internal parts, like the ball or poppet, move freely. In a horizontal setup, make sure the valve is level and the flow direction matches the arrow. Some valves work better in one position than the other. Always check the instructions to see what the maker recommends.
| Position | Best For | What to Watch For |
|---|---|---|
| Vertical | Upward flow, gravity assist | Make sure flow goes up |
| Horizontal | Most standard installations | Keep valve level, match direction |
Valve Type Considerations
Not all check valves are the same. Some use a ball, while others use a poppet. Ball check valves often work well in any position, but poppet types might need to be upright for the best seal. If your system has low flow or low pressure, a ball valve might be better. For high-pressure systems, a poppet valve gives a tighter seal. Always match the valve type to your system’s needs and the flow direction.
Connecting Ports
Now you are ready to connect the ports. This step is important for a leak-free and safe system. Follow these steps:
- Connect the hydraulic hose from your pressure source to the IN or P port on the valve.
- Attach the hose from the valve’s OUT or CF port to the part of the system you want to control.
- If your valve has an EF port, make sure it has a clear, low-pressure path back to the reservoir. Avoid any blockages here. This keeps pressure spikes from happening.
Note: Always tighten fittings by hand first. Then use a wrench to finish, but do not over-tighten. Too much force can damage the threads or the valve body.
Check each connection for the right fit. Make sure the hoses do not twist or pull on the valve. A good connection keeps the flow steady and prevents leaks. If you see any leaks after you start the system, stop and check your work. Fix any problems before you run the system at full pressure.
Seals and Tightening
You want your hydraulic check valve to stay leak-free and secure. That means you need to pay close attention to seals and how you tighten the fittings. If you rush this step or skip it, you might end up with leaks, wasted fluid, or even damage to your valve.
Here’s how you can get a perfect seal every time:
- Choose the Right Seals:
Most check valves use O-rings or flat gaskets. Always use the type and size the manufacturer recommends. If you use the wrong seal, you might get leaks or poor performance. - Inspect the Sealing Surfaces:
Look at the ends of the valve and the fittings. Make sure they are clean and smooth. Dirt, scratches, or old sealant can stop the seal from working. Wipe away any oil or debris before you start. - Apply Sealant (If Needed):
Some valves need a thread sealant or Teflon tape. Check the instructions. If you use Teflon tape, wrap it around the threads two or three times. Keep the tape away from the end of the fitting so it does not get into the system. - Install the Seals:
Place the O-ring or gasket in the groove or on the fitting. Make sure it sits flat and does not twist. A twisted seal can cause leaks. - Hand-Tighten First:
Start by screwing the fittings together by hand. This helps you line up the threads and keeps you from cross-threading. - Use a Wrench for Final Tightening:
After hand-tightening, use a wrench to finish the job. Turn the fitting until you feel resistance, then give it a small extra turn. Do not force it. Over-tightening can crush the seal or strip the threads.
Tip: If you are not sure how tight is tight enough, check the torque specs in the manual. Too loose means leaks. Too tight means damage.
Common Sealing Problems and How to Avoid Them:
| Problem | What Causes It | How to Fix It |
|---|---|---|
| Leaks | Loose fittings, bad seals | Tighten to spec, replace seals |
| Damaged Threads | Over-tightening | Use proper torque, don’t force it |
| Pinched O-rings | Twisted or misaligned seals | Seat O-rings carefully, check fit |
| Sealant in System | Too much tape or paste | Use only what’s needed, keep tidy |
Take your time with this step. A good seal keeps your system safe and saves you from messy cleanups later.
Common Mistakes and Backflow Issues
Incorrect Installation
You might think installing a check valve is simple, but mistakes happen all the time. If you put the valve in backwards, you can cause backflow. This means fluid moves the wrong way and can damage your system. Sometimes, you miss the flow direction arrow or ignore the instructions. That’s when trouble starts. You may see leaks, strange noises, or even total system failure.
Here are some frequent mistakes you should watch for:
- Water hammer can happen when fluid changes direction quickly. You’ll hear loud noises and feel vibrations. This can damage pipes and fittings.
- Oversizing the valve makes it chatter. The valve opens and closes too fast, which wears it out.
- Reverse flow at pump discharge valves can cause big problems. Pumps might run dry or lose pressure.
- Debris in the fluid sticks to the valve. This can make it jam or damage the inside parts.
- Wrong position or orientation leads to operational failures. Always check the markings and diagrams.
Tip: Always double-check the flow direction before you tighten the fittings. If you’re unsure, stop and look at the manufacturer’s drawing.
Blocked Flow
Blocked flow is another common issue. If you install the check valve in the wrong position, you can stop fluid from moving. Some valves need to be upright or level. If you ignore this, the valve might not open at all.
You might notice chattering. This means the valve is not installed right. The wrong valve type can also block flow. If you use a valve that doesn’t match your system, you’ll see poor performance.
- Many check valves are orientation specific. If you install them wrong, you block flow.
- Unsuitable valves can cause flow issues. Always pick the right valve for your system.
Note: If you hear rattling or see slow movement, check the valve’s position and type.
Pressure Spikes and Leakage
Pressure spikes and leaks can make your system unsafe. If you use the wrong seal or install the valve poorly, you’ll see leaks. High pressure or heat wears out seals faster. Dirty fluid damages seals and causes leaks.
Here’s what can cause pressure spikes and leaks:
- Normal wear over time. Seals break down after many cycles.
- Too much system pressure. This stresses seals and makes them fail.
- High operating temperatures. Heat ages seals and reduces lubrication.
- Contaminated hydraulic fluid. Dirt and water damage seals.
- Wrong seal material. Some seals can’t handle high pressure or heat.
- Poor installation. If you don’t assemble the valve right, seals fail early.
Pressure spikes happen when the check valve closes quickly. This creates shock waves. Water hammer effects can damage pipes and cause leaks. If you pick the wrong valve, you make pressure spikes worse.
| Cause | Consequence |
|---|---|
| Sudden pressure changes | Shock waves, water hammer |
| Seal failure | Leaks, reduced efficiency |
| Contaminated fluid | Seal damage, leaks |
Leaks waste fluid and force pumps to work harder. You’ll see more wear on parts and higher heat. Erratic control and pressure changes can cause unexpected shutdowns. Always check seals, pressure, and fluid quality to keep your system safe.
Actuator Failure
If you put a hydraulic check valve in the wrong way, you can have more problems than just leaks or pressure spikes. You can also make the actuator stop working right. Actuators are parts that move things in your hydraulic system. They can push, pull, lift, or turn. If the check valve does not work right, the actuator might not move, or it could move the wrong way.
Here is how this can happen:
- Backflow lets fluid go the wrong way. The actuator needs steady pressure to work. If fluid goes backward, the actuator loses pressure. It might stop or move when it should not.
- Trapped pressure can lock the actuator. If the check valve closes at the wrong time, it can trap fluid inside the actuator. This can lock it in place. You might not move it until you let out the pressure.
- Pressure spikes can damage seals. Fast changes in pressure can break the seals inside the actuator. When seals break, fluid leaks out. The actuator loses power and cannot work.
Tip: If your actuator moves slow, drifts, or will not hold its spot, check the check valve first. Many times, a small valve problem causes big actuator trouble.
Here are some signs of actuator failure from check valve problems:
| Symptom | Possible Cause | What You Should Check |
|---|---|---|
| Actuator drifts | Reverse flow through check valve | Valve installed backwards |
| No movement | Blocked or stuck check valve | Debris or wrong orientation |
| Jerky movement | Pressure spikes or trapped air | Valve closing too quickly |
| Loss of holding force | Leaking seals from pressure surges | Damaged actuator seals |
You might see the actuator does not stay in one place. Maybe it moves when it should not. Sometimes, it will not move at all. These are all signs something is wrong with the check valve or how it was put in.
How can you stop actuator failure?
- Always look for the flow direction arrow before you put in the valve.
- Make sure the valve fits your system’s pressure and flow.
- Clean the valve and ports before you put it in.
- Test the actuator after you finish. Watch for slow movement or drifting.
Note: If you see actuator problems, do not just get a new actuator. Check the check valve first. Fixing a small valve problem can save you time and money.
When you pay attention to check valve flow direction and how you put it in, you help your actuators work better and last longer. This keeps your whole hydraulic system working well.
Troubleshooting Check Valve Problems
No Flow
You expect fluid to move through your system, but sometimes nothing happens. When you see no flow, you need to act fast. Here’s a simple way to figure out what’s wrong:
- Watch for symptoms. Is the actuator not moving? Do you hear silence when you expect action?
- Grab your system schematic. This drawing shows you how everything connects.
- Check the pressure at different points. Use a gauge to see if the numbers match what the manual says.
- Look closely at the check valve and hoses. Do you see leaks, dents, or broken parts?
- Try to isolate the problem. Disconnect one part at a time to see where the flow stops.
- Inspect the hydraulic fluid. Dirty or thick fluid can block the path.
If you follow these steps, you can find the cause of no flow. Sometimes, a stuck check valve or clogged line is the problem. Other times, the fluid is just too dirty to move.
Tip: Always keep your fluid clean and check for debris before you start up the system.
Reverse Leakage
Reverse leakage means fluid sneaks past the check valve when it should not. You want the valve to block reverse flow, but sometimes it fails. Here’s how you can spot and fix this issue:
| Aspect | Details |
|---|---|
| Internal Leakage | Only a tiny amount should leak during reverse flow. |
| Measurement | You can measure leakage in milliliters per minute or drops per minute. |
To check for reverse leakage, do this:
- Push fluid through the valve in the normal direction. Make sure it flows easily.
- Switch the pressure to the other side. The valve should block reverse flow.
- Watch for signs of backflow. If you see fluid moving backward or pressure dropping upstream, you have a problem.
Common causes of reverse flow include worn seals, dirt stuck inside, a broken spring, or installing the valve the wrong way. If you notice these symptoms, you may need to clean, repair, or replace the check valve.
Note: Even a small amount of reverse flow can cause big problems, like actuator drift or loss of holding pressure.
Pressure Drop
You might notice the pressure drops more than you expect as fluid moves through the check valve. This can slow down your system or make it less powerful. Several things can cause a pressure drop:
- The design of the valve matters. A simple, smooth design lets fluid move with less resistance. Complex shapes or extra parts can slow things down.
- The faster the flow, the bigger the pressure drop. High flow rates push fluid harder, which means more energy gets lost.
- Thick or sticky fluid needs more force to move. If your hydraulic oil is too thick, you’ll see a bigger pressure drop.
- If the valve is too small for your system, it restricts the flow and increases the pressure drop.
If you see a big pressure drop, check the valve size, the type of fluid, and the flow rate. Sometimes, just switching to a larger valve or using cleaner, thinner fluid can fix the problem.
Tip: Always match the valve size and type to your system’s needs to keep pressure drop low and performance high.
Noise and Vibration
Do you hear strange sounds coming from your hydraulic system? Maybe you feel the pipes shake or notice a buzzing noise near the check valve. Noise and vibration are common signs that something is not right with your check valve. These problems can make your system less reliable and even damage other parts if you ignore them.
Why do noise and vibration happen?
Check valves can make noise when they open and close too quickly. This fast movement can cause a “chattering” sound. Sometimes, the valve slams shut, which sends shock waves through the pipes. You might hear banging or feel the system vibrate. Here are some reasons this happens:
- The valve is too big for your system. Oversized valves do not stay open and shut smoothly.
- The flow rate changes quickly. Sudden starts and stops make the valve move fast.
- Air is trapped in the system. Air bubbles can make the valve bounce.
- The spring inside the valve is weak or broken. This lets the valve move too much.
Tip: If you hear chattering or banging, stop the system and check the valve size and spring. You might need a smaller valve or a new spring.
How can you fix noise and vibration?
- Check the valve size. Use a valve that matches your flow rate.
- Bleed the system to remove air. Air makes noise and causes vibration.
- Inspect the spring. Replace it if it looks worn or broken.
- Slow down the flow changes. Open and close valves slowly if you can.
Here’s a quick table to help you spot the cause:
| Symptom | Possible Cause | What to Do |
|---|---|---|
| Chattering | Oversized valve | Use correct valve size |
| Banging | Fast flow changes | Slow down flow |
| Buzzing | Air in system | Bleed air out |
| Rattling | Weak spring | Replace spring |
If you fix these problems early, you keep your system quiet and safe.
Cylinder Drift
Have you ever noticed your hydraulic cylinder moves when it should stay still? This is called cylinder drift. It means the cylinder slowly slides or drops, even when you do not touch the controls. Cylinder drift can be a big problem, especially if you need your machine to hold a load in place.
What causes cylinder drift?
Most of the time, cylinder drift happens because the check valve is leaking. Fluid sneaks past the valve and lets the cylinder move. Sometimes, the valve is dirty or worn out. Other times, the valve is installed the wrong way.
How can you spot cylinder drift?
- The cylinder does not hold its position.
- The load drops slowly over time.
- You see a drop in pressure on the gauge.
Note: Cylinder drift is not always easy to see. Watch your machine closely when it is supposed to stay still.
How do you fix cylinder drift?
- Check the check valve for leaks. Replace it if you see fluid passing through.
- Clean the valve and the lines. Dirt can stop the valve from sealing.
- Make sure the valve is installed in the right direction.
- Inspect the cylinder seals. Sometimes, the problem is a worn-out seal, not the valve.
Here’s a quick checklist for you:
- Watch for slow movement or drifting.
- Listen for hissing or see leaks.
- Test the valve and seals.
If you fix cylinder drift early, you keep your system safe and your loads secure.
Selecting the Right Check Valve
Pressure and Flow Rate
You want your hydraulic system to run smoothly, so picking the right check valve matters. Start by looking at your system’s pressure and flow. Every valve has limits. If your system pushes too much pressure or moves fluid too fast, the valve might not work right. You need to match the valve’s pressure rating and flow capacity to your setup.
Let’s break it down. Check your system’s maximum pressure and the highest flow you expect. If you use thick oil or work in hot conditions, the valve needs to handle those too. The speed of your actuator also affects your choice. If you want fast movement, pick a valve that responds quickly. Some systems need electronic control or remote adjustment. Make sure your valve fits those needs.
Here’s a quick table to help you compare:
| Criteria | Description |
|---|---|
| Pressure and flow range | Match the valve to your system’s needs |
| Temperature and viscosity | Make sure the valve works with your fluid |
| Actuator speed and response | Pick a valve that keeps up with your actuator |
| Control requirements | Decide if you need electronic or remote control |
| Pump configuration | Know if your pump is constant or variable |
Tip: Always check the valve’s specs before you buy. If you’re not sure, ask your supplier for help.
Cracking Pressure
Cracking pressure is a big deal when you choose a check valve. It’s the pressure needed to open the valve and let fluid flow through. If the cracking pressure is too high, your system might not move as you want. If it’s too low, you could get unwanted flow or leaks.
Several things affect cracking pressure:
- Valve size and the weight of the internal parts. Bigger valves usually need more pressure to open.
- How you install the valve. Gravity can help or make it harder for the valve to open.
- Service conditions and wear. Over time, springs and seals change, which can shift the cracking pressure.
- Contamination in the fluid. Dirt or debris can block the valve or change how it opens.
You should always check the valve design, its condition, and how you plan to install it. If your fluid is dirty, clean it before you install the valve. This keeps the cracking pressure steady and your flow direction correct.
Note: If your system needs precise control, pick a valve with a cracking pressure that matches your requirements.
Valve Size and Connection
Valve size and connection type are important for a safe and efficient system. If you pick a valve that’s too small, you’ll restrict flow and lose power. If it’s too big, you might get noise or vibration. You also need to think about how the valve connects to your pipes.
Here are some things to consider:
- Make sure the valve material matches your fluid. This prevents corrosion and keeps the valve working longer.
- Look at how fast the valve opens and closes. Quick response helps prevent surges and keeps your system stable.
- Choose a design that minimizes head loss. Less resistance means better efficiency.
- Think about the total cost. Maintenance and energy use matter, not just the price tag.
- Pick a valve with non-slam features. This helps prevent pressure surges when the valve closes.
Check out this table for more details:
| Factor | Description |
|---|---|
| Flow Coefficient (Cv) | Shows how much fluid can move through the valve at a set pressure drop. |
| Pressure Ratings | Make sure the valve can handle your system’s highest pressure. |
| Response Time | Fast opening and closing keeps your system running smoothly. |
| Mounting Types | Choose flanged, threaded, or welded connections based on your system’s design and pressure levels. |
Tip: Always measure your pipes and check your system’s layout before you pick a valve. This helps you get the right size and connection for your flow direction.
Material and Medium
You want your hydraulic system to last, right? Picking the right material for your check valve matters a lot. The material decides how well the valve stands up to pressure, heat, and the fluid moving through it. If you use the wrong material, you might see rust, cracks, or even leaks. That can mess up your system and cost you money.
Let’s look at some common materials:
- Brass: Works well with water and mild chemicals. Brass resists corrosion and handles moderate pressure.
- Stainless Steel: Handles high pressure and tough fluids. Stainless steel lasts longer and fights rust.
- Carbon Steel: Good for heavy-duty jobs. It’s strong but can rust if the fluid is harsh.
- Plastic: Used for low-pressure systems. Plastic valves are light and cheap but don’t like hot or strong fluids.
You also need to think about the medium. Is your system moving oil, water, or something else? Some fluids eat away at certain materials. If your fluid is acidic or has lots of dirt, you need a valve that can handle it. Always check the maker’s chart to match the material to your fluid.
Tip: If you’re not sure, ask your supplier. They can help you pick a valve that fits your fluid and keeps your flow steady.
Here’s a quick table to help you decide:
| Material | Best For | Not Good For |
|---|---|---|
| Brass | Water, mild chemicals | Strong acids, high heat |
| Stainless Steel | High pressure, tough fluids | None (very versatile) |
| Carbon Steel | Heavy-duty, clean fluids | Corrosive fluids |
| Plastic | Low pressure, clean fluids | Hot, dirty, strong fluids |
Installation Space
You don’t want to squeeze a check valve into a tight spot and hope for the best. The space where you install the valve affects how well it works and how easy it is to fix later. If you pick a valve that’s too big, you might block other parts or make maintenance hard. If it’s too small, you could restrict flow and hurt your system’s performance.
Here’s what you should check:
- Measure the space where the valve will go. Make sure there’s room for the valve and the fittings.
- Look at how you’ll reach the valve for repairs. If you can’t get to it, you’ll have trouble fixing leaks or changing seals.
- Think about the direction of flow. The valve needs to line up with your pipes so fluid moves easily.
- Check for obstacles like walls, brackets, or other equipment. You don’t want anything blocking the valve or making it hard to install.
Note: Always plan ahead. If you leave enough space, you make your system easier to work on and keep your flow smooth.
When you pick the right material and make sure you have enough space, you help your hydraulic system run better and last longer. You also make your job easier when it’s time to check or fix the valve.
Conclusion
You want your hydraulic system to work well and stay safe. Watching the hydraulic check valve flow direction helps stop backflow and keeps your equipment safe. Here are the most important things:
- Check valves stop fluid from going backwards and prevent pressure spikes.
- They keep oil from flowing back and separate accumulators.
- If you put the valve in wrong, fluid can get blocked and cause trouble.
Use good steps for installing and fixing problems:
- Choose the right valve for your system.
- Look for the flow arrow and do not put the valve near elbows or tees.
If you need help, Chenyang Hydraulic can give you support and special solutions:
| Support Type | What You Get |
|---|---|
| Product Selection Assistance | Help picking the right valve |
| Technical Communication | Answers from engineering experts |
| Customization | Solutions made for what you need |
FAQ
How do I know which way to install a hydraulic check valve?
Look for an arrow on the valve body. This arrow shows the correct flow direction. If you do not see an arrow, check the manual or ask the supplier.
Can I install a check valve in any position?
Most check valves work in both vertical and horizontal positions. Some types need a certain position for best performance. Always read the instructions before you start.
What happens if I install the valve backwards?
If you install the valve backwards, fluid cannot flow. You might get backflow, leaks, or even damage your equipment. Always double-check the flow direction before you tighten anything.
How often should I check or replace my check valve?
Check your valve during regular maintenance. If you see leaks, noise, or slow movement, inspect the valve right away. Replace it if you find damage or wear.
Why does my system make noise near the check valve?
Noise can mean the valve is too big, installed wrong, or has trapped air. Try bleeding the system and check the valve size. Replace weak springs if needed.
Can I clean a hydraulic check valve?
Yes, you can clean most check valves. Remove the valve, wipe away dirt, and check for damage. Put it back only if it looks good and moves freely.
What is cracking pressure?
Cracking pressure is the minimum pressure needed to open the valve. If your system pressure is lower than this, fluid will not flow through the valve.
Who can help me choose the right check valve?
You can ask your supplier or contact Chenyang Hydraulic for advice. They can help you pick the best valve for your system and answer technical questions.